You’ve probably known about Meta Business Supervisor, previously known as Facebook Business Administrator. Meta depicts this as their apparatus to “oversee promotion records, Pages, and individuals who work on them — across the board place.
As yet dealing with your Facebook Pages and promotion represents your image through your record? Sharing logins is making way for security and protection concerns, and physically adding and doling out jobs to partners on a Facebook Page can be monotonous.
This makes it essential for offices and organizations to utilize the Facebook Business Supervisor so they can safely deal with their Facebook Pages and promotion accounts in a single spot.
If you haven’t begun utilizing the Facebook Business Administrator since it appears to be confounding or scary, fortune has smiled on you. This post gives you a definite aid on the most proficient method to utilize the Facebook Business Chief and how it can help your showcasing on Facebook. We should make a plunge.
Free Guide: How to Market on Facebook and Instagram

On the off chance that you haven’t known about it, or on the other hand if you have close to zero familiarity with it, Meta Business Director is a significant device assuming that you have more than one promotion account, assuming that you want to follow separate clients’ promotions or pages and make reports for them, or then again assuming that your organization involves Facebook for various administrations connected with your business.
Here, you’ll learn all that you want to be familiar with Meta (Facebook) Business Supervisor and how to utilize it to produce brand mindfulness on Meta’s social stages.
What is a Meta Business Manager?
Meta Business Chief, previously known as Facebook Business Director, is a device to assist you with making, distributing, screening, and reporting on different business-related resources, including your business’ Facebook Pages or your Facebook commercials. Business Administrator permits you to give incomplete or full admittance to various workers and appoint them to various jobs inside the stage.
The Facebook Business Chief assists your group with remaining coordinated and centered while observing, making, and distributing promotions, pages, and other business resources on Facebook.

Here, we’ll dig into how to make a Meta Business Chief record; how to add your business pages, promotions, and individuals; how to utilize the examination devices in your record; and how to separate the most worth from the promotions supervisor device.
To keep this article simple to follow, we will expect your business to be keen on involving the Business Chief for your pages and promotions instead of for your client’s pages and advertisements. We’ll likewise utilize the names “Meta Business Chief” and “Facebook Business Administrator” conversely.
Is Meta Business Chief unique about your Facebook account?
While Meta Business Chief isn’t attached to your record, you truly do require an individual Facebook record to utilize Facebook Business Director.
Relax. Your own Facebook account will not be apparent. Facebook Business Director just shows you your business resources, including promotion accounts, pages connected with your business, and publicizing or web-based entertainment investigation. It doesn’t have a newsfeed and will not send you warnings from your record.
Step-by-step instructions to Set Up Facebook Business Chief:
Go to business.facebook.com and click the ‘Make Record’ button close to the button that peruses ‘Sign in.’
Fill in your business name and email in the spring-up screen, and snap ‘Submit.’
The spring-up screen will guide you to search your email for affirmation of your record.
Click the connection in your email to affirm your record.
Setting up your Facebook Business Supervisor account is straightforward. The Facebook Business Supervisor account is an unexpected set-up process in comparison to an individual Facebook account. The Business Supervisor setup requires your business name and email to start. It’s a simple four-step process that took me around two minutes.
This is your specialty:
1. To begin with, go to business.facebook.com and click the blue “Make Record” button.
To make another Business Chief record, click the “Make Record” button close to or beneath the “Sign In” button. If you have not previously signed in to your Facebook account, you’ll be provoked to sign in. You’ll likewise require your business data prepared to enter in the following spring-up screen.
2. Then, fill in your business name and email in the spring-up, and click “Submit.”
You’ll be approached to enter your business name and email on this spring-up screen. Since you are signed in to Facebook as of now, your name will currently be populated in the case.

You’ll need to ensure you are utilizing a business email that your representatives perceive, as this is the email you’ll use to welcome and relegate jobs to your workers. Meta doesn’t permit the utilization of exceptional characters in the business name field, so you’ll need to forget about those.
3. The spring-up screen will then request that you affirm your email. Go to your inbox and open the email with the headline, “Affirm your business email.”
After entering your data and submitting it, Meta will request that you affirm your business email. The spring-up screen will guide you to browse your email.
You will see an email that says, ” “Confirm your business account.” If you don’t quickly see this email in your inbox, make certain to look at your garbage, spam, or social envelopes.
4. Open the email from Facebook and click “Confirm now.”
“This window will give you admittance to your Business Chief record. Assuming that it looks scary from the get-go, simply sit back and relax, Facebook Business Director is pretty intuitive. Let’s dig into how to add pages and promotion records to your Business Supervisor account.
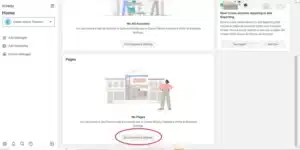
How to Add Facebook Business Pages to Your Meta Business Chief AccountOn your Meta Business Director landing page, you’ll promptly see a Promotion Record Execution module.
You might have to look down to see the Pages module in your Business Record:
.1. To begin with, look to the Pages module and snap “Go to business settings.”
“Since your Meta Business Supervisor is new, you should interface your Facebook Pages to your record. To interface a Facebook page to your Meta Business Supervisor, look down to the Pages Module. Then, at that point, click the “Go to business settings” button
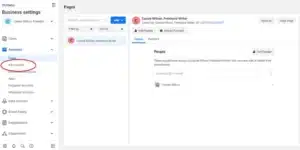
“2. Click the “Add” button in the new window. In the menu, pick “Add a Page.”When you click “Go to business settings,” another window will open. In this window, you will want to associate your Facebook pages with your Business Administrator account. Click the “Add” button to interface a page.”
“3. In the spring-up screen, type the name of your Facebook Page or enter your URL. Then click the “Add Page” button. This spring-up screen will provoke you to type your Facebook Page in the bar or glue your Page’s URL. If you type your Page name in the bar, your Page ought to be the most readily accessible choice. If not, glue the URL. Whenever you have chosen your Page, click the “Add Page” button.”
“4. If you see this spring up with a green mark, you’re good to go! Your page is effectively added. That’s it! Now that you’ve effectively added your Page, you’ll have the option to see it in your Meta Business Suite entry.”
“The most effective method to Add Your Facebook Promotion AccountsAdding your Facebook promotion account is a practically indistinguishable cycle to adding a page, however, I’ll walk you through the means here so you can see them in action. It’s essential to note you can add one advertisement account from the outset, and afterward, you’ll have the option to add extra advertisement accounts once you begin burning through cash in your most memorable promotion account.
However, you can’t have more than five advertisement accounts at any one time
1. Click the “Promotion accounts” interface as an afterthought board on your homepage. Underneath the Business settings, you’ll see the sideboard. Click on the “Promotion accounts” connection to associate your Promotion record to your Meta Business Suite.”
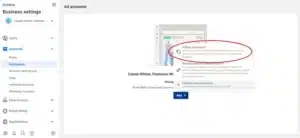
“2. Click the “Add” button. In the spring-up menu, pick “Add a promotion account.”After you click “Add an advertisement account,” you’ll see three choices. You can add your record, add another person’s record, or make another record. With the end goal of this post, we’ll accept you as of now have your promotion represent your Facebook Page. To add the promotion account, click “Add a promotion account.”
“3. Enter your “Promotion account ID” into the container. At the point when no doubt about it, “Add Promotion Account.”To associate your advertisement record with your Meta Business Director, you want your record ID. On the off chance that you don’t have a clue about your ID, sign in to your current Promotions Chief. You ought to see your ID in the dropdown menu of the hunt bar. This is the ID you’ll use to associate your record with the Business Manager. Once you have your promotion account ID, enter it into the promotion account ID box. Twofold check that your promotion account ID is the right record and number succession. When you enter your ID and interface it to your Business Director, you can’t erase it.”
Step-by-step instructions to Add Individuals:
“Step-by-step instructions to Add Individuals to Your Business Director AccountFor this model, we’ll zero in on adding inside representatives to your Business Chief Record, not clients or outside advisors. Adding individuals to your record is simple, and you can restrict how much access every worker gets. Limiting admittance to “representative as it were” is useful if, for example, you need to dole out one worker to deal with your Instagram record and screen that examination, however at that point you believe one more worker in the group should deal with your promotion records and those analytics.
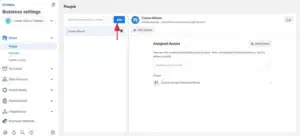
1. To start with, go to the sideboard under Business settings and pick “Clients.” In the dropdown menu, select “People.”To add a representative to your Business Supervisor, find the “Clients” tab as an afterthought board of the fundamental screen. Then, select “Individuals.” This will open another screen.”
“2. Then, click the blue “Add” button featured below. Adding a client is basic. Click the blue “Add” button to begin the interaction. You’ll have to know the email of the representative you are adding to your Business Chief.”
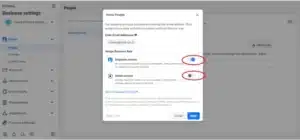
“3. Type in a worker’s email address (so Facebook can send them an email with access consents), and afterward select “on” for all things considered “Representative access” or “Administrator access.” Then, click “Next.”To add a representative, you’ll have to enter their email address. Before clicking “Next,” choose if you will relegate the client to “Worker access” or “Administrator access.” Setting a client to “Administrator access” will give them unlimited oversight of your Business Chief record. To appoint extra jobs, like Money Investigator, Money Manager, or Engineer, click the “Show Progressed Choices” button.”

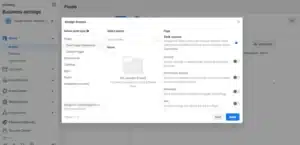
“4. Allocate your worker to any of the resources on the right of the spring-up screen. Click on every resource for appoint jobs and undertakings. Whenever you are done, click “Invite.”Here, you have several unique choices. You can dole out your worker to any of the resources on the right of the spring-up screen (Pages, Promotion Records, Lists, Applications, Pixels, and Instagram Record). On the off chance that you click on every resource tab, you can appoint various assignments and jobs for the representative inside the resource. For instance, under the Pages resource, you might ask your worker with content creation or errand them with directing comments. Once you play doled out parts and assignments for your representative, click “Welcome.”
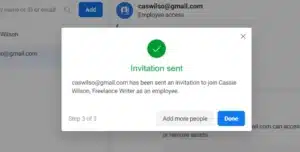
“5. Presently, your representative has been sent a greeting. Click “Done indeed” or “Add more people.”Great! You’ve added a worker to your Meta Business Chief record. Ensure your worker knows to browse their email and adhere to the guidelines in their email to wrap up affirming their record. Assuming you are done adding individuals to your Business Supervisor, click “Done.” If you have more representatives to add to your record, click ”
“The most effective method to Erase Facebook Business Supervisor Go to ‘Settings’ in Facebook Business Director. Select ‘Business Data.’ Snap ‘For all time Erase Business’ on the upper right-hand corner of the page.”
“Promotions Supervisor ToolsNow that we as a whole are set up, you may be interested in a portion of the extra advantages of making a promotion inside Business Manager. When making an advertisement in Promotions Director, perhaps of the greatest benefit (as you’ll long see) is the capacity to make a profoundly designated center segment bunch with the “make new crowd” feature.
You can pick an orientation, age, district, and language to venture into and jump into the particular interests you need your crowd to share. Then you’re given evaluations in light of your crowd and spending plan, similar to the number of individuals that you’re supposed to contact day to day and the number of individuals that will click your connection.
Those exhibition measurements are basic when choosing whether to increment or reduce crowd size or whether your spending plan is huge enough. Here’s how to make a promotion to Promotion Supervisor:”
“1. As an afterthought board of the landing page, click “Advertisements Manager.”Under the Meta Business Suite logo, you’ll see the sideboard. To get to the Advertisements Director, click the “Promotions Chief” button.”
“2. To make a promotion, click “Make Advertisement” in the right corner of the screen. On the other hand, click on “Get started.”If you have not recently made Facebook promotions, Facebook will provoke you to begin. Click the “Get everything rolling” button at the lower part of the screen. Or then again click “Make Promotion” in the right-hand corner of the screen. The two buttons will open the promotion creation page.”
“3. Select your goal. When making a Facebook promotion, you want to pick an objective for your promotion. You can make a computerized commercial, direct people to your site, advance your Facebook Page, produce more leads, or make a promotion to create inbound messages. With the end goal of this model, we will pick the objective “Advance your Page.”
“4. Then, fill in the subtleties to plan your Facebook ad. To advance your Page with a Facebook promotion, you want first to compose a depiction for your advertisement. Then, click “Alter choices” to pick a photograph for your promotion. You can transfer a picture or select a photograph that you as of now have connected to your pages. The Promotion box will provide you with a thought of what your advertisement will resemble to your crowd.”
“5. Then, look down to make your crowd. Click the pencil symbol to alter the crowd description. In the spring-up window, look down to the “Crowd” module. Click the pencil symbol toward the edge of the module to alter the crowd portrayal. Finish up the data as per the crowd that you wish to reach. You don’t have to finish up the entirety of the data, yet the more data you incorporate, the more probable you’ll arrive at your objective segment.”
“6. Congrats! You have made your most memorable Facebook Promotion. To survey your promotion, click on the Advertisements Director tab and snap on “All ads.”The Promotions Chief tab is the most straightforward method for evaluating your promotions. Click on “All promotions” to see a rundown of your advertisements. This tab will give significant data and examination, for example, reach, impressions, cost per result, and importance score.”
“Meta Business Chief InsightsLastly, here’s an overall outline of your “Experiences” tab and what the Bits of Knowledge page resembles:”
“We won’t go too inside and out with investigation, or experiences, since it’ll change definitely relying upon your business’ publicizing objectives, financial plan, and audience.
However, it’s vital to take note of a couple of huge parts of the Business Chief’s bits of knowledge to guarantee you comprehend the instrument’s most great functions. Hot tip: Look at Meta Business’ promoting data page to study Facebook promotion capabilities, read examples of overcoming adversity for industry-explicit organizations, and get motivation and thoughts to further develop your own ads.
Business Supervisor Experiences Capabilities You’ll Need to Know About Facebook Pixel:
Assuming you introduce Facebook Pixel, your site can contact individuals with promotions on Facebook after they’ve visited your site. Split testing: Utilize A/B testing to sort out which advertisements lead to the most elevated transformation rate.Conversion lift:
Utilize this apparatus to guarantee your advertisements are really producing changes and sales. Mobile SDK,
On the off chance that your business has an application, utilize Versatile SDK to see what moves individuals are making inside your application and utilize that data to further develop promotion crusades across devices. Brand lift: Figure out what your promotions are meaning for your image picture to streamline promotions for better brand awareness. Use Meta Business Director to Work on Your Span on Facebook.

The Meta Business Supervisor will assist you with dealing with your Facebook presence down to the colleagues who can get to your record. Exploit this device to send off compelling promotions on Facebook, look at your Facebook system, and lift your KPIs across Meta’s social platforms. Editor’s note: This post was initially distributed in May 2018 and has been refreshed for completeness.”
You May Like: How to Do Market Research & 7 steps in the marketing research process.